
The Ultimate Guide to Looker Studio Embedding: Thumbnail, Preview & App View Techniques
Have you ever wondered how to create a sleek, embedded Looker Studio report that doesn't scream "I'm a Looker Studio report"? Or needed a way to quickly generate thumbnails of your dashboards for a report gallery? In this guide, we'll explore three powerful but often overlooked features that can transform how you share and present your Looker Studio reports.
As data visualization becomes increasingly central to business communication, knowing how to properly showcase your dashboards can be just as important as creating them. Let's dive into these practical techniques that will help you present your Looker Studio work more professionally and efficiently.
Three URL Tricks That Will Change Your Looker Studio Game
Did you know that by simply modifying the URL of your Looker Studio reports, you can completely change how they're displayed? These three endpoint modifications (thumbnail, preview, and app view) offer unique ways to share and embed your dashboards that go beyond the standard sharing options.
1. Generating Report Thumbnails
Ever needed a quick visual preview of your Looker Studio reports? The thumbnail endpoint makes this incredibly simple.
How It Works
Any Looker Studio report URL follows this basic structure:
lookerstudio.google.com/reporting/[REPORT_ID]/page/[PAGE_ID]/editBy adding /thumbnail to this URL (replacing /edit or /page/[PAGE_ID]), you'll get a 320×240 pixel image of the first page of your report:
lookerstudio.google.com/reporting/[REPORT_ID]/thumbnailPractical Applications
This feature is perfect for:
Creating a visual directory of your reports on an internal portal
Adding preview images to documentation
Including thumbnails in emails when sharing report links
Building a report gallery on your website or intranet

Important Considerations
While incredibly useful, the thumbnail feature does have some limitations:
It only generates thumbnails of the first page of your report
The person accessing the thumbnail URL must have at least viewer access to the report
If your report uses a data source with "Viewer's credentials" enabled, the thumbnail will not generate
2. Creating Report Templates with Preview Mode
The preview endpoint transforms any Looker Studio report into a professional template that others can easily copy and customize.
How It Works
Add /preview to your report URL:
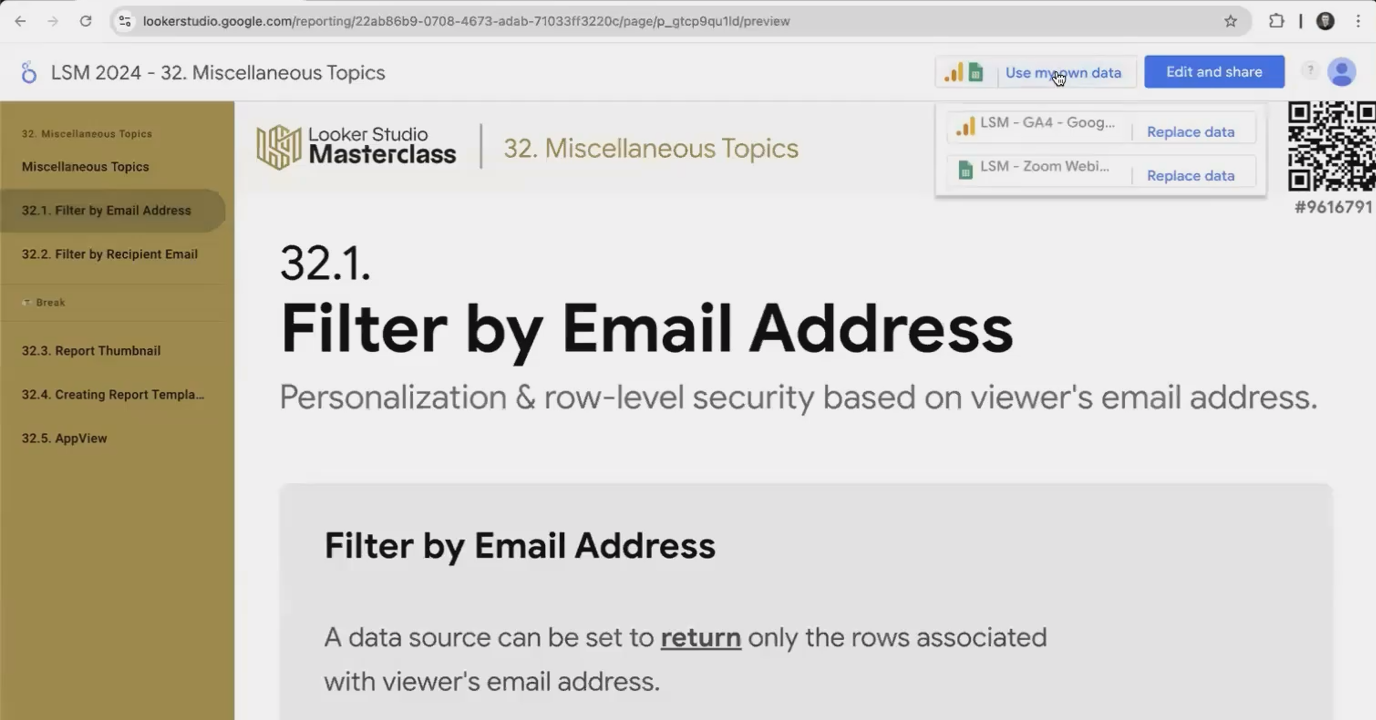
lookerstudio.google.com/reporting/[REPORT_ID]/previewThis presents your report with a simplified interface featuring two prominent options:
"Use my own data" - Allows users to replace the data sources with their own
"Edit and share" - Creates a copy of the report they can customize
Why Use Preview Mode?
This approach is significantly more user-friendly than the standard method of asking people to click the three-dot menu and select "Make a copy." The preview mode:
Provides clear visual guidance on how to use the template
Streamlines the data replacement process
Creates a more professional template-sharing experience
Reduces confusion for less experienced Looker Studio users
Pro Tip
When creating report templates to share via preview mode, consider using placeholder data that clearly illustrates the purpose of each visualization. This makes it easier for users to understand how to apply the template to their own data.
3. Creating "White-Label" Reports with App View
Perhaps the most powerful of these URL modifications is the app view endpoint, which creates a clean, embedded view with no Looker Studio branding or navigation.
How It Works
Add /app to your report URL:
lookerstudio.google.com/reporting/[REPORT_ID]/appThe result is a completely chromeless version of your report (no headers, no navigation bars, no footers). This is as close as you can get to a white-labeled Looker Studio report without custom development.
Perfect for Embedding
App view is ideal for:
Embedding reports in iframes on your website
Integrating dashboards into internal tools or portals
Creating kiosk displays for offices or public areas
Providing client-facing dashboards that feel like part of your own platform
Design Considerations
The most important thing to understand about app view is that it's not scrollable. The report will only render content visible within the current viewport. This means:
Design your report to fit within a single screen if possible
If embedding in an iframe, make the iframe large enough to show all content
For multi-page reports, keyboard navigation (arrow keys) still works, but there are no visible navigation controls
As a workaround for longer reports, you can create a larger iframe that allows scrolling within the embedding page, even though the app view itself doesn't scroll.
Bonus Tip: Instant Report Creation
Need to create a new Looker Studio report quickly? Skip the Looker Studio homepage and simply type one of these URLs in your browser:
reports.new - Creates a new blank report
dashboard.new - Also creates a new blank report (these do the same thing)
This is similar to how docs.new and sheets.new work for Google Docs and Sheets; a real time-saver when you're creating reports frequently!
Frequently Asked Questions (FAQs)
Can I generate thumbnails for pages other than the first page of my report?
Unfortunately, no. The thumbnail feature only works for the first page of a report. If you need thumbnails of other pages, you'll need to create them manually or use screen capture tools.
Will people viewing my embedded report in app view be able to edit it?
No, the app view is a view-only mode. Even if users have edit access to the original report, they would need to access the standard URL to make changes.
How do I make my embedded report responsive to different screen sizes?
App view adapts to the viewport size it's displayed in, but it doesn't automatically adjust visualizations. For best results, use relative sizing for charts and consider creating separate reports optimized for different device types (desktop, tablet, mobile).
Is there any way to make app view scrollable?
The app view itself isn't scrollable, but you can place it in a scrollable container (like an iframe with scrolling enabled) to achieve a similar effect. The key is to make the iframe tall enough to contain all your content.
Are these URL modifications officially supported by Google?
The thumbnail and preview endpoints are documented features. The app view endpoint is not officially documented but has been working reliably since at least 2020. As with any undocumented feature, there's always a small risk that it could change in future updates.
These three simple URL modifications (thumbnail, preview, and app view) dramatically expand what's possible with Looker Studio reports. They allow you to create more professional presentations of your data, streamline the template-sharing process, and achieve a nearly white-labeled embedding experience.
By mastering these techniques, you'll be able to integrate Looker Studio reports more seamlessly into your websites, internal tools, and client communications which makes your data visualizations more accessible and impactful.
Note:
This post is based on a subject covered in the Looker Studio Masterclass Program. To learn more about Looker Studio Masterclass, click here.