
Looker Studio Email Filtering: How to Create Personalized Dashboards at Scale
If you've ever needed to share a single dashboard with multiple stakeholders (while ensuring each person sees only their relevant data) you're about to discover one of Looker Studio's most powerful yet underutilized features.
The ability to personalize reports based on a viewer's email address transforms how organizations deliver insights to teams, clients, and partners. Let's explore how to implement this capability and the strategic advantages it provides for your reporting workflow.
What Is Email Filtering in Looker Studio?
At its core, email filtering (officially known as "Filter by Email Address") is Looker Studio's implementation of row-level security. This feature allows you to create one master report that dynamically filters data based on who's viewing it.
What makes this approach particularly powerful is that it doesn't just hide unauthorized data, it never returns that data to the report in the first place. When a user opens your report, Looker Studio identifies their Google-authenticated email address and returns only the rows from your dataset where the email column matches the viewer's email.
Real-World Applications That Solve Business Problems
Before diving into implementation, let's consider some practical scenarios where email filtering delivers exceptional value:
Sales Team Dashboards: Create a single performance dashboard where the VP sees everyone's numbers, regional managers see their team's data, and individual representatives only view their personal metrics.
Multi-Location Business Analytics: Franchise owners, store managers, or regional directors can access the same report but see metrics specific to their location(s).
Client Reporting at Scale: Agencies can build one master report template and share it with dozens of clients, with each client seeing only their own campaign performance.
Educational Progress Tracking: Schools can create student portals where each learner sees only their own grades, attendance, and academic progress.
In each case, you're eliminating the need to create, maintain, and update dozens (or hundreds) of individual reports. Instead, you build once and personalize automatically.
Setting Up Basic Email Filtering: Step-by-Step Guide
Let's walk through implementing email filtering for a standard Looker Studio account:
1. Prepare Your Dataset
First, ensure your dataset includes an email column that contains the exact email addresses of all intended report viewers. This is the cornerstone of the entire process; without this column, email filtering simply won't work.
For example, if you're creating a sales dashboard, your data source might include:
Sales figures
Product information
Region/territory
Salesperson name
Salesperson email address ← This is the critical column!
Remember: The email addresses in your dataset must match exactly (including case) with the Google account emails of your report viewers.
2. Connect Your Data Source to Looker Studio
Once your dataset is prepared, connect it to Looker Studio as you normally would:
Create a new report or open an existing one
Add or edit a data source
Select your data platform (Google Sheets, BigQuery, etc.)
Complete the connection process
3. Enable Email Filtering on Your Data Source
Now for the crucial step:
From your report, go to Resource → Manage added data sources
Find your data source and click Edit
In the data source editor, click Filter by email
Toggle the switch to Enable "Filter by email address"
From the dropdown menu, select the field in your dataset that contains email addresses
Click Done to save your settings
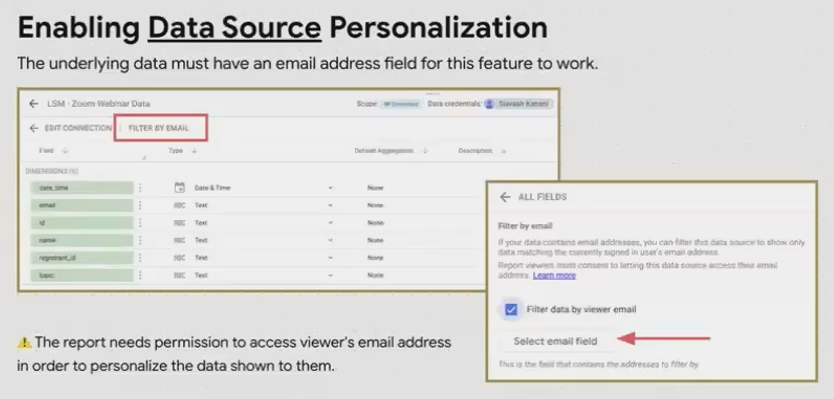
The Looker Studio interface for enabling email filtering on a data source, highlighting where to select your email field.
4. Build Your Report as Usual
With email filtering enabled, you can now build your report as you normally would. The beauty is that you only need to create charts, tables, and other visualizations once and they'll automatically display the appropriate data based on who's viewing the report.
5. Share Your Report
When you share your report, viewers will need to:
Sign in with their Google account
Grant consent for Looker Studio to access their email address (a one-time prompt)

Once they complete these steps, they'll see only the data that corresponds to their email address in your dataset.
Leveling Up: Email Filtering with Scheduled Deliveries (Pro Feature)
For Looker Studio Pro users, the email filtering capability extends beyond interactive reports to scheduled deliveries; a game-changer for automated reporting workflows.
What This Pro Feature Enables
With a Pro account, you can schedule a single report to be delivered (as PDF or CSV) to multiple recipients, with each recipient receiving a personalized version containing only their data.
For example, you could schedule a monthly performance report to be automatically sent to 50 different store managers, with each manager receiving a PDF that displays metrics for their store alone.
Setting Up Scheduled Delivery with Email Filtering
From your report, click the Share button
Select Schedule email delivery
Set your delivery frequency (daily, weekly, monthly)
Add recipient email addresses
Enable the option "Filter the delivered report data by recipient email"
Complete the scheduling process

This eliminates the need to create separate scheduled reports for each recipient; saving enormous amounts of time for reporting at scale.
Advanced Tips and Troubleshooting
Case Sensitivity Matters
One of the most common issues with email filtering is case sensitivity. If your dataset stores emails as "John.Doe@Company.com" but the user logs in with "john.doe@company.com," the filter won't match.
Best Practice: Store all email addresses in lowercase in your dataset. This provides the most consistent experience across different email providers and login methods.
Working with Non-Google Email Addresses
What if your organization uses Outlook or another email provider? Good news: users don't need Gmail accounts for email filtering to work.
Any email address can be associated with a Google account for authentication purposes. Users simply need to:
Visit accounts.google.com
Create a new account using their existing email address (e.g., name@companydomain.com)
Complete Google's verification process
This doesn't change their email provider; it simply registers their address with Google's authentication system, making it recognizable for Looker Studio's row-level security.
Handling Multiple Authorized Viewers Per Row
Sometimes you need multiple people to see the same data row. For example, both a regional manager and a store manager might need access to the same store's data.
While you can't include multiple emails in a single cell, you can use data blending with a cross-join to create the necessary relationships. Google provides detailed documentation on implementing this approach by searching for "Filter by multiple email addresses per row" in the Looker Studio help center.
Frequently Asked Questions (FAQs)
What happens if someone tries to access a report but their email isn't in the dataset?
They'll see an empty report with a "No data" message. The charts will appear, but without any data points.
Can I use email filtering with any data source?
Yes, as long as the data source includes an email column. This works with Google Sheets, BigQuery, CSV uploads, and most other connected data sources.
Does this affect report performance?
Since the filtering happens at the data source level, it can actually improve performance, especially with large datasets. The report only needs to process the subset of data relevant to the current viewer.
Can I combine email filtering with other filters in my report?
Absolutely! Email filtering happens first at the data source level, and then any additional filters you've added to your charts or report will apply to the already-filtered data.
How do I test the email filtering before sharing with my team?
Create a test row in your dataset with your own email address and make sure it displays correctly. Then, ask a colleague to view the report (after adding their email to your dataset) to verify they see only their data.
Email filtering transforms how you can deliver personalized insights at scale with Looker Studio. By implementing this powerful feature, you'll:
Eliminate the need to maintain multiple versions of the same report
Enhance data security by ensuring users only see what they're authorized to access
Create a more streamlined, personalized experience for your report viewers
Save significant time in your reporting workflow
For organizations managing reporting across multiple stakeholders, locations, or clients, this feature alone can justify the adoption of Looker Studio as your primary reporting platform.
Start implementing email filtering today, and watch how it revolutionizes your approach to dashboard sharing and distribution!
Note:
This post is based on a subject covered in the Looker Studio Masterclass Program. To learn more about Looker Studio Masterclass, click here.