
How to Use Looker Studio's Manual Publishing Feature for Professional Dashboard Development
Have you ever made changes to a Looker Studio report only to realize your clients could see your work-in-progress? This common frustration happens because, by default, Looker Studio updates reports in real-time for all viewers. Fortunately, there's a solution: manual report publishing.
In this blog post, we'll explore how to take control of when your changes go live, allowing you to work confidently behind the scenes without disrupting your stakeholders' experience.
Why Manual Publishing Matters
Picture this scenario: You're redesigning a dashboard that the CEO checks daily. As you're moving charts around and testing new visualizations, they log in and see a half-finished, potentially broken report. Not ideal, right?
Manual publishing creates a separation between your working environment (the draft) and what your audience sees (the published version). This separation is essential for:
Professional delivery: Present only polished, complete work to stakeholders
Uninterrupted experimentation: Test new ideas without worrying about real-time viewers
Quality control: Verify everything works before making it public
Team collaboration: Allow multiple editors to work on improvements before revealing them
How to Enable Manual Publishing
Enabling this feature takes just a few seconds:
Open your report in Edit mode
Navigate to File > Publishing Setting
Toggle the switch to enable Manual publishing
Click Save
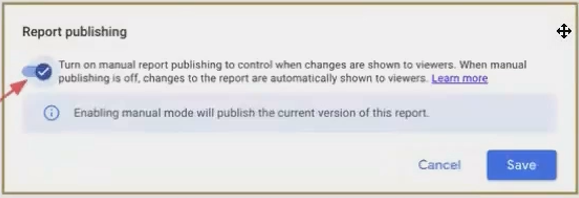
Enabling manual publishing gives you control over when your changes become visible to viewers.
Once enabled, you'll notice a new "Publish" button in your menu. This is what you'll click when you're ready to push your draft changes to the live version.
Understanding Draft vs. Published Versions
After enabling manual publishing, your report exists in two states:
The Draft Version
This is your workspace where you can:
Make experimental changes
Fix errors
Add editor-only notes
Restructure layouts
Test new data visualizations
Only editors can see these changes. This version is automatically saved as you work.
The Published Version
This is what your viewers see. It remains unchanged until you explicitly publish your draft. Think of it as your "production environment" - stable and reliable.
As an editor, you can toggle between viewing your draft and the published version to compare them. This helps you understand exactly what changes will go live when you publish.

Publishing Your Changes
When you're satisfied with your draft and ready to make it public:
Review your changes one last time
Click the Publish button in the top menu
Confirm in the dialog box that appears
After publishing, both versions become identical until you make new changes to the draft.
Important Considerations
Reusable vs. Embedded Data Sources
It's crucial to understand that manual publishing has different effects depending on your data source type:
Embedded data sources (created within the report): Changes to these follow the draft/publish workflow. Modifications to calculated fields, formulas, and settings won't be visible to viewers until published.
Reusable data sources (standalone sources): Changes to these are immediately live across all connected reports, regardless of publishing settings. This is because reusable data sources exist independently of any specific report.
Copying Reports with Manual Publishing Enabled
When someone makes a copy of your report, what they get depends on their access level:
Viewers making copies get only the published version
Editors making copies get both the draft and published versions
This difference matters when sharing templates or transferring report ownership to team members.
Real-World Applications
Manual publishing shines in several common scenarios:
Client-Facing Reports
When working with clients, manual publishing allows you to implement their feedback in stages. You can collect multiple change requests, implement them all, and then publish once for a "big reveal" rather than showing incremental changes.
Report Redesigns
For major overhauls, you can completely redesign a dashboard while viewers continue to use the current version. Only when your new design is perfected do you publish, minimizing disruption.
Team Collaboration
When multiple team members are editing a report, manual publishing prevents viewers from seeing a potentially chaotic work-in-progress as different editors make their contributions.
Frequently Asked Questions (FAQs)
If multiple people are editing a report with manual publishing enabled, are they all working on the same draft?
Yes. There is only one draft version per report. All collaborators with edit access will be making changes to that single draft. Unlike some other Google products (like Tag Manager), Looker Studio doesn't have separate workspaces or branches.
Does enabling manual publishing affect reports that are already shared?
Yes. As soon as you enable manual publishing, the current state becomes the published version. From that point forward, any changes you make will only be visible to viewers after you publish them.
Can I schedule automatic publishing at regular intervals?
No. Publishing must be done manually by clicking the publish button. There's no scheduling feature for this functionality.
If I disable manual publishing after making draft changes, what happens?
Your current draft immediately becomes visible to all viewers. From that point forward, all changes will be visible in real-time again.
Best Practices for Manual Publishing
To get the most out of this feature:
Add descriptive notes in your draft for yourself or other editors about what needs to be fixed before publishing.
Publish regularly to avoid a growing gap between draft and published versions, which can make it harder to remember what changes you've made.
Communicate with team members about when you plan to publish, especially if multiple people are editing.
Use version history (File > Version History) alongside manual publishing to track significant milestones in your report development.
Consider disabling manual publishing for minor tweaks to avoid the extra step of publishing for small changes.
Manual report publishing is one of those "hidden gem" features in Looker Studio that separates casual users from professionals. By taking control of when your changes go live, you create a more polished experience for your stakeholders while giving yourself the freedom to experiment and iterate.
Whether you're a consultant managing client expectations, an analyst preparing reports for executives, or a team lead coordinating dashboard development across multiple editors, manual publishing helps you deliver with confidence.
Remember: Enable it through File > Publishing Setting, make your changes in draft mode, and only publish when you're ready for the world to see your work.
Want to learn more about managing your Looker Studio assets? Check out our other guides on version history, audit logs, and report tracking to take your data visualization workflow to the next level.
Note:
This post is based on a subject covered in the Looker Studio Masterclass Program. To learn more about Looker Studio Masterclass, click here.