
How to Group & Categorize Data in Looker Studio with Boolean & IF Functions
In today's data-driven world, the ability to transform raw data into meaningful insights is a superpower. While Looker Studio offers numerous visualization options, the real magic happens during data transformation – particularly when we group and categorize data to reveal patterns that would otherwise remain hidden.
Welcome to this deep dive into one of Looker Studio's most powerful capabilities: using Boolean logic and conditional functions to create insightful data groupings. Whether you're trying to segment customers, classify performance metrics, or clean up messy dimension values, the techniques we'll explore today will dramatically enhance your Looker Studio reports.
Understanding the Boolean Data Type: The Foundation of Conditional Logic
Before we dive into the advanced functions, we need to understand the building block that makes it all possible: the Boolean data type.
What Exactly is a Boolean?
A Boolean is a special field type that can only have two possible values:
True/False
Yes/No
0/1
On/Off
Unlike text fields that can contain any string or numeric fields that can hold a range of numbers, Boolean fields are binary. They represent one of two possible states. This simplicity makes them perfect for conditional logic.
As the Google Cloud documentation confirms, Boolean functions play a crucial role in Looker Studio's logical transformation capabilities, allowing users to evaluate conditions as either true or false. This becomes the foundation for more complex data manipulations.
Where Do Boolean Fields Come From?

Boolean fields can originate from several sources:
1. Directly From Your Data Source
Your connected data source might already provide Boolean fields. For example, if you connect to BigQuery, you might receive fields like "Marketing Consent" or "Is Subscribed" that are natively Boolean.
Looker Studio automatically detects these Boolean fields and displays them with a distinctive icon. In tables, they typically appear as "Yes/No" or "True/False" values.
2. Created with Functions
You can create Boolean fields using functions that evaluate to either true or false:
CONTAINS_TEXT(field, "substring")– Checks if a text field contains a specific substringREGEXP_CONTAINS(field, "pattern")– Tests if a text field contains a pattern that matches a regular expressionREGEXP_MATCH(field, "pattern")– Tests if a text field fully matches a regular expression patternSTARTS_WITH(field, "prefix")– Checks if a text field begins with a specific prefixENDS_WITH(field, "suffix")– Checks if a text field ends with a specific suffixISNULL(field)– Evaluates whether a field contains a null value
3. Generated with Comparison Operators
Comparison operators compare two values and produce a Boolean result:
=(Equals)!=(Not Equals)>(Greater Than)>=(Greater Than or Equal To)<(Less Than)<=(Less Than or Equal To)
For example, LTV > 250 evaluates to true for customers with a lifetime value greater than $250 and false for everyone else.
4. Constructed with Logical Operators
Logical operators allow you to combine multiple conditions:
AND: Returns true only if all conditions are trueOR: Returns true if at least one condition is trueNOT: Negates the result (true becomes false, false becomes true)IN: Checks if a value exists in a list of values
5. User-Controlled via Parameters
You can create Boolean parameters that users can toggle, giving them control over aspects of your report.
Creating Boolean Fields in Looker Studio: Practical Examples
Let's explore how to create and use Boolean fields with real-world examples.
Booleans from Your Data Connector
When connecting to a data source like BigQuery that contains Boolean fields, Looker Studio automatically recognizes them.
For example, if your BigQuery table has a "Marketing Consent" field of Boolean type, Looker Studio will identify it as a Boolean field. You can then:
Add it to tables where it will display as "Yes/No" or "True/False"
Apply conditional formatting (e.g., green for "Yes", red for "No")
Use it in filters or as conditions in calculated fields
Important: A Boolean field is different from a text field containing the words "true" or "false". They may look the same visually, but they're handled differently by Looker Studio's functions.
Creating Booleans with Functions
Let's say you want to identify customers with Yahoo email addresses. You can create a Boolean field like this:
CONTAINS_TEXT(Email, "yahoo")This function checks if the Email field contains the substring "yahoo" and returns true or false accordingly.
Once created, you can use this Boolean field to:
Filter your report to show only Yahoo users
Create visualizations comparing Yahoo users to others
Use it in further calculated fields
Creating Booleans with Comparison Operators
Comparison operators are perfect for creating thresholds. For instance, to identify high-value customers:
LTV > 250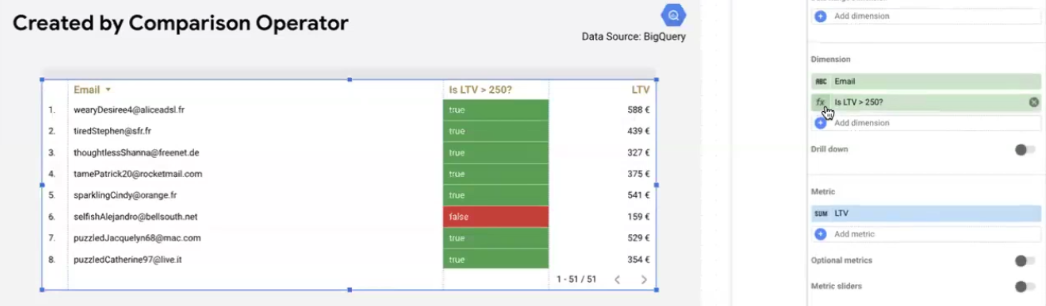
This simple expression creates a Boolean field that's true for customers with a Lifetime Value above $250 and false for everyone else.
Creating Booleans with Logical Operators
Logical operators let you create more complex conditions by combining multiple criteria.
Using OR
To identify customers who are either high-value OR use Yahoo:
LTV > 250 OR CONTAINS_TEXT(Email, "yahoo")This returns true if either condition is met.
Using IN
The IN operator is particularly useful for checking if a value belongs to a predefined list. For example, to identify West Coast states:
State IN ("California", "Oregon", "Washington", "Alaska", "Hawaii")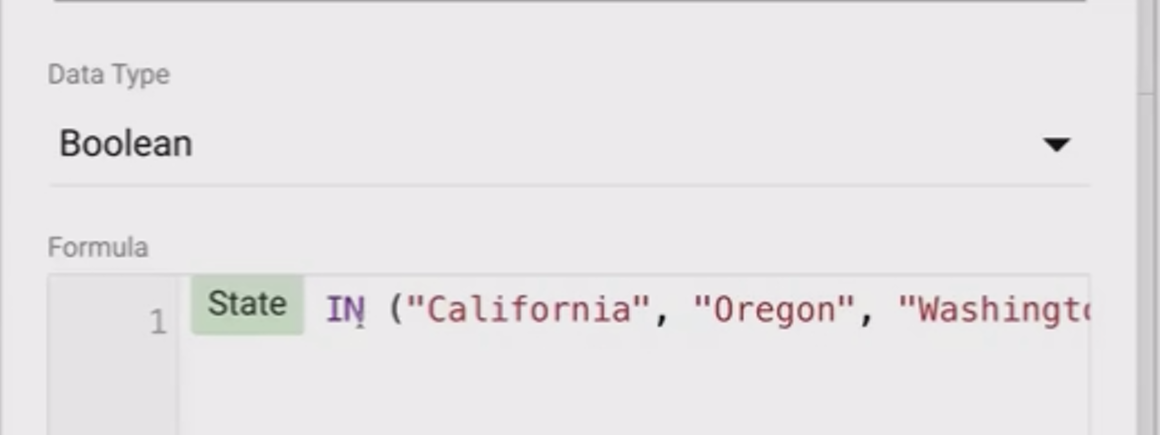
This is much cleaner than writing:
State = "California" OR State = "Oregon" OR State = "Washington" OR State = "Alaska" OR State = "Hawaii"Creating Booleans with Parameters
Parameters allow report users to control aspects of your visualization. A Boolean parameter can be connected to a checkbox control, giving users a simple on/off switch.
For example, you could create a "Redact Email" parameter that, when checked, hides full email addresses:
Create a Boolean parameter named "Redact Email" with a default value of false
Add a checkbox control to your report connected to this parameter
Create a calculated field that uses the parameter value:
IF(Redact Email, CONCAT(LEFT(Email, 3), "***", "@", REGEXP_EXTRACT(Email, "@(.+)")), Email)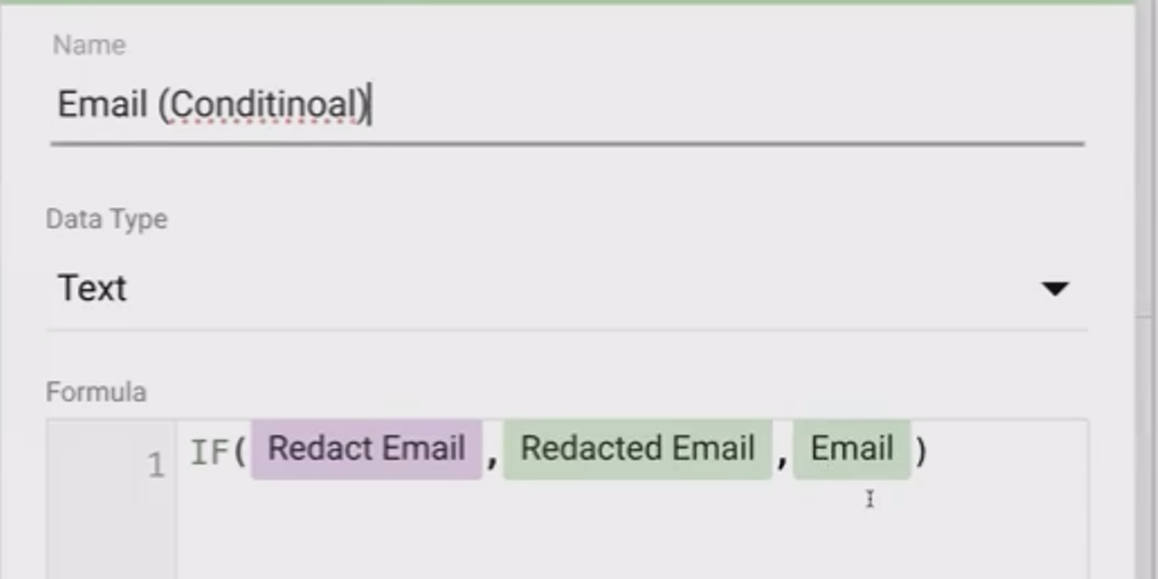
This calculated field shows the full email when the parameter is false and a redacted version when it's true. When users click the checkbox, they can toggle between viewing full or redacted emails.
The IF() Function: Your First Tool for Conditional Categorization
The IF function is the simplest way to create conditional logic in Looker Studio, allowing you to return different values based on whether a condition is true or false.
IF() Function Anatomy
The basic syntax is:
IF(condition, result_if_true, result_if_false)Where:
conditionis any expression that evaluates to true or falseresult_if_trueis the value returned when the condition is trueresult_if_falseis the value returned when the condition is false
The power of IF lies in its versatility – the results can be:
Text strings
Numbers
Other fields
Expressions or functions
Practical Examples of IF() in Action
Let's explore several real-world applications of the IF function.
String-Based Categorization
Imagine you're tracking website traffic and want to distinguish between your new and old hostnames. You could create a calculated field like this:
IF(Hostname = "shop.merch.google", "New Hostname", "Old or Other Hostname")This simple categorization allows you to:
See how much traffic each hostname type receives
Compare metrics between your new and old hostnames
Create cleaner visualizations by removing the original hostname dimension
Parameter-Driven Outputs
Parameters can make your IF statements dynamic. For instance, to let users toggle between actual and forecasted LTV:
Create a Boolean parameter "Forecast LTV?" (default: false)
Create a numeric parameter "Forecast LTV Percentage" (range: 50-250, default: 125)
Create a calculated field:
IF(Forecast LTV?, LTV * (Forecast LTV Percentage / 100), LTV)This gives users the power to:
View actual LTV by default
Switch to forecasted LTV by checking the box
Adjust the forecast percentage to model different scenarios
Numeric Condition Grouping
IF statements are perfect for creating categories based on numeric thresholds:
IF(Cost > 20000, "High Cost", "Low Cost")However, there's an important consideration here about how Looker Studio handles aggregation:
With auto-aggregated data sources (like Google Ads), the condition applies to the aggregated value shown in your visualization
With row-level data sources (like Google Sheets), the condition applies to each individual row unless you explicitly aggregate:
IF(SUM(Leads) > 500, "High Volume", "Low Volume")This distinction is crucial for getting accurate results. According to discussions on platforms like Reddit and Stack Overflow, misunderstanding this behavior is a common source of confusion when working with conditional logic in Looker Studio.
Date Expression Logic
IF statements can also work with date comparisons. To categorize data as "Last Week" or "Older":
IF(DATETIME_DIFF(TODAY(), Date, "DAY") > 7, "Older than Last Week", "Last Week")This approach is particularly useful for:
Highlighting recent data
Comparing recent performance to historical trends
Creating time-based segments
Frequently Asked Questions (FAQs)
Can I use conditional formatting with Boolean fields?
Yes! Boolean fields work wonderfully with conditional formatting. You can apply different colors or styles based on the true/false value. For example, showing "Yes" values in green and "No" values in red.
However, note that in Looker Studio's current interface, you'll need to create two separate rules – one for the true condition and one for the false condition. There isn't a single "if-then-else" rule for conditional formatting.
Why isn't my RegEx pattern working as expected with REGEXP_MATCH?
REGEXP_MATCH requires the pattern to match the ENTIRE string, whereas REGEXP_CONTAINS only needs to find the pattern somewhere within the string. If your pattern isn't matching as expected, try:
Adding wildcards to the beginning and end of your pattern (e.g.,
.*Google.*)Switching to REGEXP_CONTAINS if you only need to check if the pattern exists somewhere in the string
Using AND/NOT logic with CONTAINS_TEXT for simpler cases
According to search results and the Google Cloud documentation, this distinction between REGEXP_MATCH and REGEXP_CONTAINS is a common source of confusion among Looker Studio users.
How do I decide whether to use IF or CASE when creating categories?
Use IF when you only need two categories (true/false, yes/no, etc.). Use CASE when you need multiple categories or when you have complex conditions that would be cumbersome with nested IF statements.
Boolean fields and the IF function provide a solid foundation for data transformation in Looker Studio. By mastering these tools, you can create meaningful categorizations that turn raw data into actionable insights.
In our next section, we'll explore the more advanced CASE function, which extends these capabilities to handle multiple conditions and create sophisticated categorization schemes. Until then, experiment with Boolean logic and IF statements to start grouping your data in more meaningful ways.
Remember that effective data transformation isn't just about technical skills – it's about understanding your business questions and designing logical structures that illuminate the answers. Every Boolean field and IF statement should serve a purpose in telling your data story.
Note:
This post is based on a subject covered in the Looker Studio Masterclass Program. To learn more about Looker Studio Masterclass, click here.