
Looker Studio Data Blending: A Guide to Calculated Fields in Blend & Filters Blended Data
Ready to take your Looker Studio skills to the next level? In this deep dive into advanced data blending, you'll discover how to create calculated fields within blends and master filtering techniques that will transform your reporting capabilities. Let's unlock the full potential of your data!
Introduction: The Power of Advanced Data Blending
Data is rarely perfect. It comes from different sources, in different formats, and with different structures. This is precisely why data blending in Looker Studio is such a powerful feature – it allows us to combine disparate data sources to create comprehensive visualizations.
In today's exploration, we'll focus on two advanced aspects of data blending:
Calculated Fields in Blends: Learn when and how to create calculations before and after blending occurs
Filtering Blended Data: Master techniques for filtering your data at different stages of the blend process
But first, let's quickly revisit what happens behind the scenes when Looker Studio blends data:
Pre-Blend: Looker Studio extracts tables based on your configuration (dimensions, metrics, filters)
Blend: Tables are joined sequentially according to join conditions and keys
Post-Blend: Depending on the visualization, data may be aggregated (e.g., a total sum for a scorecard or breakdown per row for a table)
Understanding this process is crucial for mastering advanced blending techniques.
Calculated Fields in Blends: Pre-Blend vs. Post-Blend
When working with blended data sources, you can create calculated fields at two distinct points:
Pre-Blend Calculated Fields: Preparing Your Join
Pre-blend calculations are performed within individual tables before joining occurs. They're perfect for:
Standardizing join keys with different formats
Converting data types to ensure compatibility
Creating new dimensions needed for joining
Let's look at a practical example where pre-blend calculations solve real problems:
Example Scenario: We have two data sources we want to blend:
Table 1: Sales data with
Date,City(in Title Case), andRevenueTable 2: Weather data with
Year,Month,Dayas separate fields, andLocation(in lowercase)
Problem 1: The city names don't match because of different text casing.
Amsterdam (in Sales data) ≠ amsterdam (in Weather data)Solution: Create a pre-blend calculated field in the sales table:
City_Lower = LOWER(City)Then use this new field as your join key instead of the original City field.
Problem 2: The date formats don't match.
Solution: Create a pre-blend calculated field in the weather table:
Date = PARSE_DATE("%d/%m/%Y", CONCAT(Day, "/", Month, "/", Year))Now we can join on both Date and location with properly matching formats!
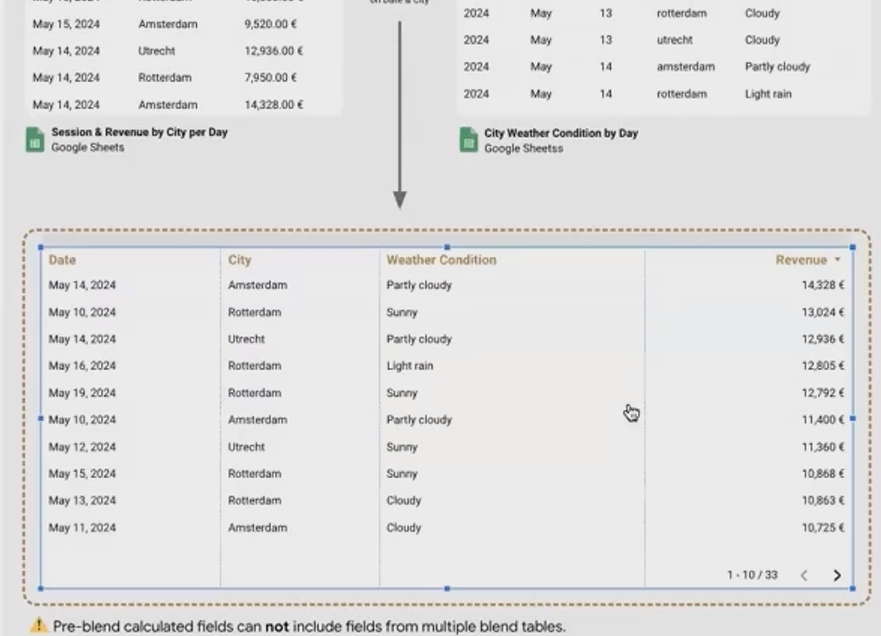
Important Limitation: Pre-blend calculations can only use fields from their own table. You cannot reference fields from other tables in the blend at this stage.
Post-Blend Calculated Fields: Analyzing Combined Data
Post-blend calculations are performed after the tables have been joined. This is where the real magic happens, as you can now:
Combine metrics from different data sources
Create consolidated dimensions
Build complex analyses that weren't possible with separate data sources
Example: With our sales and weather data now blended, we can create a "Day Type" classification:
Day_Type = CASE
  WHEN CONTAINS_TEXT(Weather_Condition, "Sunny") AND Revenue > 10000 THEN "Good Day"
  WHEN CONTAINS_TEXT(Weather_Condition, "Rain") AND Revenue < 5000 THEN "Bad Day"
  ELSE "Normal Day"
END
This calculation uses the Weather_Condition field from our weather data and the Revenue field from our sales data – something impossible without blending!
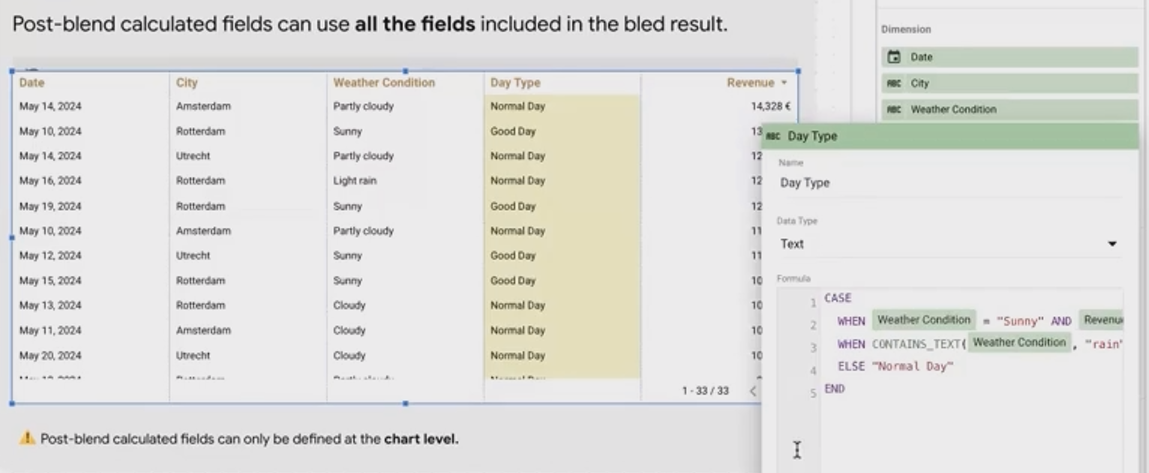
Critical Limitation: Post-blend calculated fields are chart-level only. They don't exist at the data source level, meaning you must recreate them for every chart that needs them.
Filtering Blended Data: The Advanced Guide
Just like calculations, filtering can be applied at different stages of the blending process. Understanding these differences is crucial for creating interactive dashboards.
Pre-Blend Filtering: Before the Join
Pre-blend filtering affects the data before it enters the blend. This means:
Filters applied to underlying data sources will limit what data goes into the blend
These filters act on the raw data, not the blended result
They can significantly impact join results
How It Works: Any filter control (like a dropdown) connected to one of your original data sources will filter that source before blending occurs.

Example: If you create a dropdown filter for City connected to your sales data source, selecting "Amsterdam" will:
Filter the sales data to only include rows for Amsterdam
Pass only those filtered rows to the blend
Join only Amsterdam's sales data with the corresponding weather data
Interestingly, this works even if the filtered field isn't part of your blend configuration. For example, you could filter on Transactions even if that field isn't explicitly used in your blend.
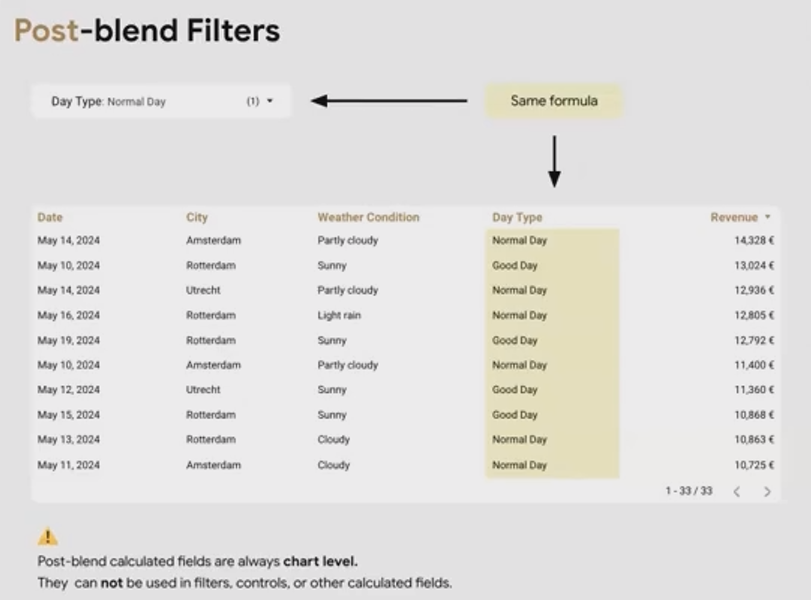
Post-Blend Filtering: After the Join
Post-blend filtering works on the result of the blend and is typically more straightforward:
Filters apply to the final blended dataset
They can use any field available in the blend result
They don't affect the join process itself
The Simple Case: Filtering on a dimension that exists in the blend (like Weather_Condition) works exactly as expected. Create a filter control, connect it to your blended data source, and select that field.
The Challenge: Trying to filter using a post-blend calculated field (like our "Day_Type" example) will not work!
This limitation exists because post-blend calculated fields don't have persistent "Field IDs" that Looker Studio can track across different components. Even if you create identical formulas in two places, Looker Studio sees them as completely separate fields.
Frequently Asked Questions (FAQs)
Why can't I filter on a post-blend calculated field?
Post-blend calculated fields exist only at the chart level and don't have persistent Field IDs. This means dropdown filters can't "communicate" with charts using these fields, even if the formulas are identical.
Can I use fields from different tables in a pre-blend calculation?
No. Pre-blend calculations can only reference fields from their own table because they're evaluated before the join occurs. You need to wait for post-blend calculations to combine fields from different sources.
Why does my filter work on the original field but not on my COALESCE version?
When you create a consolidated field using COALESCE, it's a post-blend calculation without a shared Field ID. For filtering to work, you need advanced techniques (which we'll cover in a future post on field ID injection).
What's the difference between calculated fields in the data source vs. in a chart?
Data source calculated fields have persistent IDs and can be reused across multiple charts and filters. Chart-level calculated fields exist only within that specific chart and can't be referenced elsewhere.
When should I use pre-blend vs. post-blend calculations?
Use pre-blend calculations when:
You need to standardize join keys
You need to transform data before joining
Use post-blend calculations when:
You need to combine fields from different sources
You want to create metrics based on the joined data
Mastering calculated fields and filtering in blended data sources unlocks powerful reporting capabilities in Looker Studio. By understanding the distinction between pre-blend and post-blend operations, you can solve complex data challenges and create more interactive, insightful dashboards.
In our next blog, we'll explore even more advanced techniques, including the powerful "Field ID trick" that solves the post-blend filtering challenge. Stay tuned!
Note:
This post is based on a subject covered in the Looker Studio Masterclass Program. To learn more about Looker Studio Masterclass, click here.