
How to Filter Post-Blend Calculated Fields in Looker Studio
Have you ever set up what seemed like a perfectly logical filter in Looker Studio, only to find it does absolutely nothing when you click it? If you're working with blended data, you're not alone. This is one of the most confusing aspects of Looker Studio that even experienced users struggle with.
Today, I'll walk you through a powerful technique that solves one of the most frustrating limitations in Looker Studio's data blending capabilities: filtering on consolidated dimensions.
Let's tackle a real-world scenario that you might face when analyzing marketing data from multiple platforms.
The Real-World Scenario: Consolidated Marketing Campaign Data
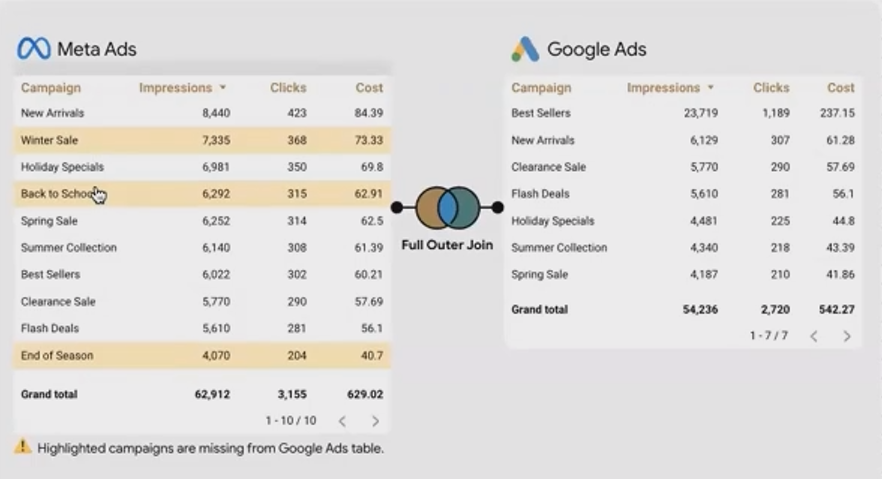
Imagine you're analyzing campaign performance across both Meta Ads and Google Ads. You have two separate data sources:
Meta Ads Data:
Campaigns (bestseller, winter sale, back to school, etc.)
Impressions, Clicks, and Cost for each campaign
Google Ads Data:
Campaigns (mostly matching the Meta campaigns, but with some differences)
Impressions, Clicks, and Cost for each campaign
Your goal is to create a consolidated view where you can:
See total performance metrics for each campaign across both platforms
Filter the view to focus on specific campaigns
Break down metrics by ad platform when needed
Step 1: Creating the Basic Blend
First, let's set up a full outer join between our two data sources:
Select both data sources in the Resources panel
Right-click and select "Blend data"
Set the join type to "Full outer join" on the "Campaign" field
Save the blend configuration
This creates a blended data source where each campaign appears once, but we'll have separate columns for Meta metrics and Google metrics (many with NULL values where a campaign doesn't exist on one platform).
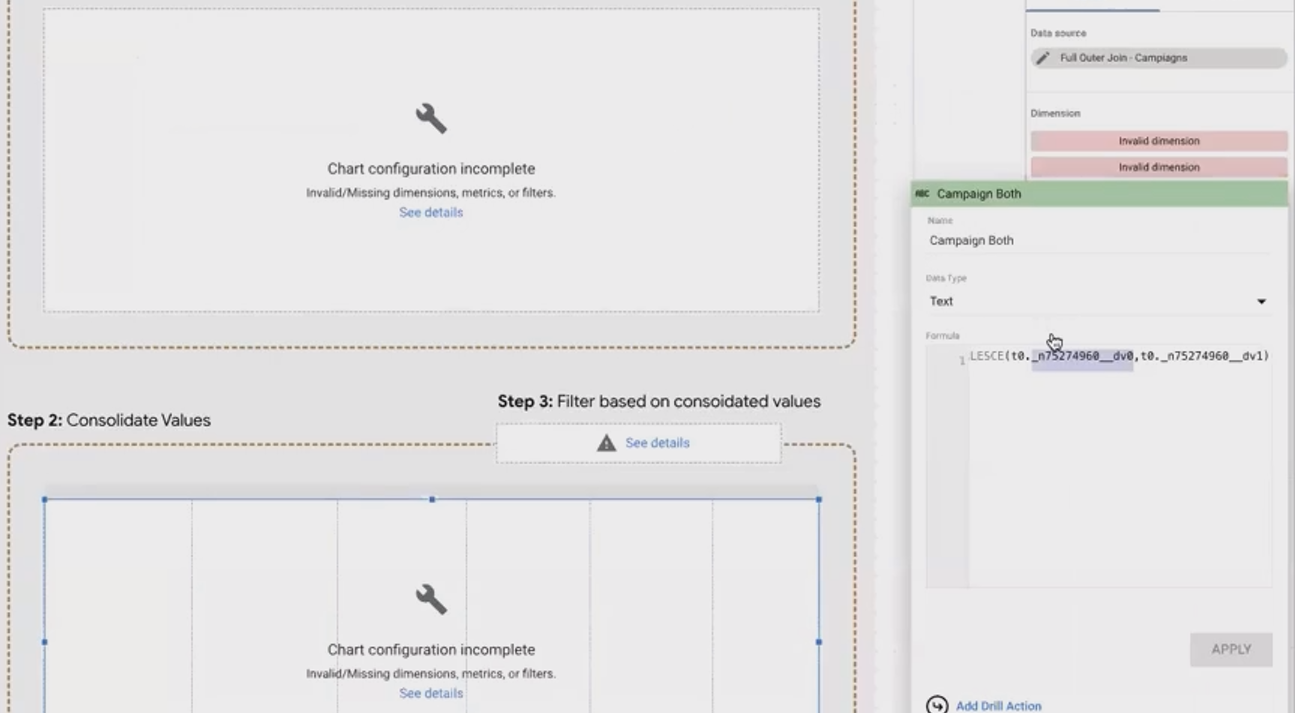
Step 2: Consolidating the Values
Now we need to create two calculated fields in our blended data source:
Campaign Both: To merge the campaign names from both sources
COALESCE(Campaign_Meta, Campaign_Google)Clicks Both: To sum up the clicks from both platforms (handling NULLs)
IFNULL(Clicks_Meta, 0) + IFNULL(Clicks_Google, 0)When we add these fields to a table, we get a nice consolidated view. Great so far!
But here comes the problem: If we try to create a filter control (like a dropdown) based on "Campaign Both" to let users select specific campaigns, it simply won't work. Even though the filter shows the right values, selecting an option does nothing to the table.

Campaign was not filtered!
Understanding Why It Doesn't Work: The Field ID Problem
Here's the technical explanation that Looker Studio doesn't tell you:
For a filter to affect a chart, a field with the same Field ID must be present in both the filter and the chart.
The issue is that post-blend calculated fields (like our "Campaign Both") don't have persistent Field IDs that can be referenced across different components. Each time you create the field, even with identical formulas, Looker Studio treats them as completely separate entities that can't communicate with each other.
The Solution: The Field ID Injection Technique
Here's the step-by-step workaround that will make your filters work:
Step 1: Uncover the Hidden Field IDs
Go to your blend configuration
Temporarily hide (don't remove) the original Campaign fields from both sources
Look at the formula for your "Campaign Both" field - it will now show errors revealing the internal Field IDs
These cryptic codes are the Field IDs Looker Studio uses internally - copy them
Filed ID of hidden dimension
Step 2: Create Mirror Fields in Your Original Data Sources
Go back to your Meta Ads data source
Add a new calculated field named "Campaign_0" (or any name you prefer)
The formula is simply the original field:
CampaignThe critical step: In the advanced options, paste the first Field ID you copied as the "Field ID" value
Repeat the process in your Google Ads data source, creating both Field IDs in both sources
Step 3: Create Your Filter Using the Mirrored Fields
Now when you create a filter control connected to either of your original data sources (not the blend), it will properly filter your blended table.
Why does this work? Because you've created fields with identical IDs in your pre-blend data sources. When the filter affects these fields, it filters the data before it enters the blend, effectively achieving what seemed impossible before.

Bonus Technique: Adding a "Source" Dimension for Breakdown
Want to break down your metrics by platform? Here's how:
In your blend configuration, add a new calculated field to the Meta Ads source:
"Meta Ads"Name this field "Source"
Do the same for Google Ads, but with the value:
"Google Ads"Crucially, add "Source" as an additional join key in your blend configuration
Create a post-blend field to consolidate these:
Source Both: COALESCE(Source_Meta, Source_Google)Add this field to your table to see a breakdown by platform
This technique allows you to toggle between a consolidated view and a platform-specific breakdown as needed.
Frequently Asked Questions (FAQs)
Why do I need to add "Source" as a join key if the values never match?
It seems counterintuitive, but it's necessary for a full outer join. Since we're using a full outer join, non-matching rows still appear in the result (with NULLs in the non-matching fields). This allows us to preserve all rows while still getting our Source field properly into the blend.
Does this technique work for other types of fields, not just text dimensions?
Yes! You can use this same approach for numeric fields, dates, or any other field type. The key is understanding that you're creating "mirror" fields with the same internal IDs.
Will I break anything by adding these custom Field IDs?
No, this is a safe technique. You're working within Looker Studio's design, just leveraging an aspect of it that isn't obvious from the user interface. Google might change how Field IDs work in future updates, but for now, this is a reliable solution.
Do I need to recreate these Field ID fields for every blend I make?
Unfortunately, yes. Each blend has its own set of internal Field IDs, so you'll need to repeat this process for each new blended data source where you want advanced filtering capabilities.
Data blending in Looker Studio is powerful but comes with limitations that aren't always obvious. The Field ID injection technique is an advanced workaround that unlocks filtering capabilities that seem impossible at first glance.
While it requires some detective work and extra steps, mastering this technique gives you the ability to create truly interactive dashboards with consolidated data from multiple sources.
Remember: data is rarely in the format you need it to be. Transformation techniques like this are essential tools in your Looker Studio toolkit.
Note:
This post is based on a subject covered in the Looker Studio Masterclass Program. To learn more about Looker Studio Masterclass, click here.