
Looker Studio Magic Links: How to Share Exact Report Views Every Time
In the world of data visualization, creating powerful dashboards is only half the battle. The real impact comes when you can effectively share those insights with your team, clients, or stakeholders. Looker Studio offers sophisticated options for sharing your reports that go far beyond simply copying a URL.
Today, we'll explore the nuanced art of generating and sharing report links in Looker Studio. I'll show you techniques that preserve your exact view settings, making communication more precise and eliminating the frustration of "I can't see what you're seeing."
The Challenge of Sharing Specific Report Views
Have you ever tried to show someone a specific insight in your Looker Studio report, only to have them see something completely different when they click your link? Perhaps they're looking at different date ranges, filtered values, or even different pages.
This disconnect happens because standard URLs don't preserve your specific view state. Let's solve this problem once and for all.
Beyond Basic Links: Three Ways to Share Your Reports
When it comes to sharing Looker Studio reports, you have several options, each with distinct advantages:
1. The Standard Browser URL Method
How it works: The simplest approach is copying the URL from your browser's address bar while in view mode.
https://lookerstudio.google.com/reporting/[report-id]/page/[page-id]Best for: Quick sharing when you don't need to preserve specific filters or settings.
Limitation: This only captures the basic report and page none of your custom selections or filters will carry over.
2. The "Share" Button Method
How it works: Click the "Share" button in the top-right corner of your report, then copy the link provided.
This gives you the same link structure as the browser method, but with the convenience of one-click copying.
Best for: Sharing the default state of your report quickly.
3. The "Magic Link" Method (Get Report Link)
This is where things get powerful and it's the method most professionals don't know about.
How it works:
Click the small arrow next to the Share button
Select "Get report link"
Check the box for "Link to your current report view"
Copy the generated link
Best for: Sharing specific insights with precise context preserved.
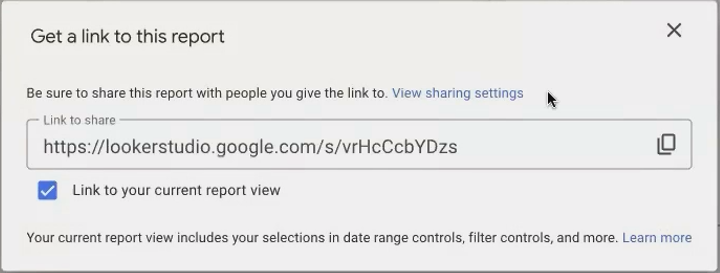
The "Link to your current report view" option is the key to preserving your exact report state
This generates a special link with an "s/" prefix instead of the standard "reporting/" structure:
https://lookerstudio.google.com/s/[unique-identifier]What Makes the "Magic Link" So Special?
When you create a link using the "Link to your current report view" option, Looker Studio captures an impressive array of settings:
✓ Applied filters: Any filter selections you've made
✓ Selected date range: The specific time period you're viewing
✓ Parameter values: Any custom parameter inputs
✓ Table pagination: Even which page of a table you're viewing
✓ Cross-filtering: Chart selections that filter other visualizations
✓ Optional metrics: Custom metric selections
✓ Drill-down settings: How deeply you've explored hierarchical data
Important: This is the only way to share a link that preserves a custom date range selection. The standard URL methods don't capture date range controls at all.
Real-World Application: Communication Precision
Let's say you're analyzing regional performance data and notice that the Southeast region shows an unusual spike in July. With the magic link method, you can:
Set the date range to July
Filter the report to show only the Southeast region
Scroll to the specific table row showing the anomaly
Generate a "current view" link
Share it with your team
When they click the link, they'll see exactly what you see, no need for instructions like "go to page 3, select July in the date range, filter to Southeast, and look at the third row."
This level of precision dramatically improves communication efficiency and ensures everyone is literally on the same page.
Professional Tip: When to Use Each Method
Use standard links when sharing a report for the first time or when you want recipients to explore from a clean slate.
Use magic links when pointing out specific insights, anomalies, or when discussing particular data points in a meeting.
Sharing Beyond the Link: Notify or Not?
When sharing reports directly with specific people, you'll notice a "Notify people" checkbox. This sends an automated email from Looker Studio informing recipients they've been given access.
Professional advice: Leave this unchecked when sharing with clients or external stakeholders. Instead, send a personalized email or schedule a brief call to walk them through the report. This gives you control of the narrative and prevents confusion when an unexpected email arrives in their inbox.
Frequently Asked Questions (FAQs)
Can I create a permanent link to a specific filtered view?
No, the "magic links" don't create permanent views. They're snapshots of your current state. If you need consistent access to specific views, consider creating separate reports with pre-applied filters.
Will my recipients need Google accounts to access the links?
Yes, for restricted sharing. Anyone you share with by email must have a Google account associated with that email address. If you're sharing with clients who don't use Google Workspace, verify they can access Google services first, or consider alternative sharing methods like PDF downloads.
Do these links capture the data at a point in time or will they show updated data?
All Looker Studio links show the current data according to your data source's refresh settings. The magic links preserve your view settings, not the data itself at a moment in time. For point-in-time snapshots, PDF downloads are more appropriate.
Can I track who's clicking on my shared links?
Looker Studio doesn't provide built-in link tracking. For monitoring report usage, consider embedding the report in a website where you can implement analytics, or upgrade to Looker Studio Pro for more advanced user tracking features.
The next time you're discussing a report with colleagues or clients, try using the magic link method:
Navigate to the specific view you want to share
Use the "Get report link" option with "Link to your current report view" checked
Share this link and ask for feedback on whether they see exactly what you intended
This simple practice will elevate your data communication and establish you as a professional who pays attention to the details.
By mastering the nuanced art of link sharing in Looker Studio, you're not just distributing reports, you're creating shared understanding. The right link with the right context eliminates confusion and helps your audience focus on what matters most: the insights your data reveals.
Want to learn more about effectively sharing Looker Studio reports? Stay tuned for our upcoming posts on embedding reports in websites, scheduling automatic deliveries, and presentation mode techniques.
Note:
This post is based on a subject covered in the Looker Studio Masterclass Program. To learn more about Looker Studio Masterclass, click here.